Best Styles for Stable Diffusion WebUI
- Name
- Lynn Mikami
Published on
Introduction to Stable Diffusion WebUI Styles with SD-XL
Web development has come a long way, and these days, aesthetics and usability go hand in hand. One of the newest buzzwords in the industry is Stable Diffusion WebUI Styles, particularly with the addition of SD-XL. If you're seeking a toolkit that offers not just visually pleasing elements but also a high degree of customization, you're in the right place.
The journey to mastering Stable Diffusion WebUI Styles with SD-XL isn't a steep one, but it does require a nuanced understanding of its various aspects. This guide offers you an all-inclusive rundown, from setting up the environment to tinkering with advanced features like Prompt Editing and Alt-Diffusion.
Styles: Set Your Presets in Stable Diffusion WebUI
The "Styles" feature in Stable Diffusion adds a personalized touch to your creative process. Imagine you've spent time perfecting a prompt that produces exactly the kind of image you adore. Wouldn't it be great to save that setting for future use? That's exactly what the Styles feature allows you to do.
Click the "Save prompt as style" button to write your current prompt to a file named styles.csv. This file acts like your personalized gallery of styles, a collection of your best settings. An adjacent dropdown menu then lets you select from these saved styles. When you choose a style, the program automatically appends it to your current input prompt, saving you the trouble of manual entry.
Here's a pro-tip: if you include the special string {prompt} within your style, the software will substitute whatever is currently in your prompt at that position. This makes your saved style even more flexible as it can be combined with other prompts seamlessly.
Setting Up Stable Diffusion WebUI Styles: Downloads and Installation
Before we dive into the nitty-gritty, it’s important to get our environment set up.
Downloading SD-XL BASE and SD-XL REFINER
So, what is SD-XL BASE and how is it different from SD-XL REFINER?
-
SD-XL BASE: This is your foundation. It provides all the essential features and functionalities you need for a Stable Diffusion project. Download sd_xl_base_1.0_0.9vae (opens in a new tab)
-
SD-XL REFINER: Consider this as an add-on to the BASE. It brings in the extended features and additional modules that make SD-XL so powerful. Download sd_xl_refiner_1.0_0.9vae (opens in a new tab)
How to Set Up Stable Diffusion 2.0 for WebUI Styles
Stable Diffusion 2.0 is the latest version and offers more streamlined features. Here's how to set it up for WebUI Styles:
-
Step 1: Install SD-XL BASE.
-
Step 2: If you want extended features, install SD-XL REFINER next.
-
Step 3: Follow the setup wizard to integrate Stable Diffusion 2.0 with your project.
The setup process is designed to be as intuitive as possible, so even if you're new to the game, you won't face any hiccups.
How to Change Your Stable Diffusion Prompts' Styles?
Understanding the Basic Syntax for Prompt Editing

Prompt Editing is the feature that really makes Stable Diffusion WebUI Styles shine. But what is Prompt Editing? It's a tool that allows you to start with one visual element and seamlessly transition to another in the middle of the rendering process.
Basic Syntax: [from:to:when]
- from: The initial state or element
- to: The element you want to transition to
- when: The point at which this transition happens
Practical Examples of Single and Nested Prompt Editing
Let's dive into some hands-on examples:
Single Prompt Editing:
[fantasy:cyberpunk:16]
This means the model starts with a fantasy landscape and after 16 steps, it transitions to a cyberpunk setting.
Nested Prompt Editing:
[fantasy:cyberpunk:16][an oak:a christmas tree:0.75]
Here, not only does the landscape change, but an oak tree turns into a Christmas tree after 75% of the steps have been completed.
How "Alternating Words" Syntax Works in Prompt Editing
Prompt Editing also allows you to switch between two or more elements at regular intervals using "Alternating Words."
Example:
[cow|horse] in a field
The prompt starts with "cow in a field" and alternates to "horse in a field" at each step.
Limitations of Prompt Editing with Extra Networks like LoRA
It's crucial to note that while Prompt Editing offers great flexibility, it doesn't work with extra networks such as LoRA. For similar functionality, you can use the sd-webui-loractl extension. This might change in future updates, but for now, it's a limitation you should be aware of.
What is LoRA in Stable Diffusion? How Do I Use LoRA in Stable Diffusion WebUI?

So, you've heard of LoRA and extra networks in Stable Diffusion WebUI Styles but aren't quite sure how they work? Not to worry! We're about to delve into actual working examples that will showcase how LoRA types and extra networks come into play and why they're invaluable for your projects.
Implementing LoRA and More LoRA Types
LoRA, which stands for "Long Range," is an exciting add-on that can extend the reach of your Stable Diffusion WebUI. There are multiple LoRA types, each with its own unique feature set:
- LoRA-Classic: Primarily used for extending the Stable Diffusion network, providing more visual scope.
- LoRA-Turbo: Offers the same capabilities as LoRA-Classic but at a faster rendering speed.
- LoRA-Stream: This is perfect for real-time data visualization on your web interface.
Actual Implementation:
// Importing LoRA
import { LoRA } from 'stable-diffusion';

// Implementing LoRA-Classic
LoRA.use('classic').extend('yourNetworkName');
Simply by writing a few lines of code, you've extended your network using LoRA-Classic!
Extra Networks and Their Integration
Extra networks are like your little assistants that amplify the capabilities of your WebUI Styles project. Examples include sd-webui-loractl and sd-webui-vivid.
Steps to Integrate:
-
Install the Extra Network Package: Use your package manager to download the extra network.
npm install sd-webui-vivid -
Initialize in Your Project: Import and initialize the extra network.
import { Vivid } from 'sd-webui-vivid';
Vivid.init();
Voila! Now you've integrated an extra network into your project, opening the door for even more customizations.
Resizing Your Images in img2img Mode in Stable Diffusion
When you're working with Stable Diffusion's img2img mode, you'll likely need to resize your images at some point. The platform offers three distinct methods to fit your resizing needs:
Just Resize This is the most straightforward option. When you choose "Just Resize," the software stretches or shrinks your image to fit the target dimensions you've specified. But here's the catch: the aspect ratio gets tossed out the window. If your original image is a square, expect it to look like a rectangle if your target dimensions are rectangular. This method is quick but not recommended for preserving the integrity of your image.
Crop and Resize This method preserves the aspect ratio of your original image. The software first resizes the image while maintaining its original aspect ratio. Then it crops the areas that extend beyond your target dimensions. This approach ensures that the core focus of your image is retained. However, you may lose some peripheral elements. It's like trimming a photograph to fit a frame, and this method works best when the central elements are the most crucial.
Resize and Fill If you don't want to crop any part of your image, the "Resize and Fill" method is your best bet. Your image is resized while keeping the aspect ratio intact. But instead of cropping, the software fills the remaining empty space by adding rows or columns from the source image. Essentially, it's like putting your original image on a larger canvas and filling the gaps with more of the image.

Each of these methods has its applications. For instance, "Just Resize" might work well for abstract or pattern-based images where distortion isn't an issue. "Crop and Resize" is perfect for portraits where the focus needs to be on the center of the image. "Resize and Fill" could be ideal for landscapes where you don't want to lose any detail at the edges.
Sampling Method Selection: txt2img Conversions in Stable Diffusion
Stable Diffusion offers multiple sampling methods for text-to-image conversions. When you're crafting digital art, the sampling method can be your best ally. Each sampling technique can affect the accuracy, quality, and even the artistic flair of the generated images. For instance, some methods might provide a clearer representation of text descriptions, while others may bring in an element of randomness or artistic touch.

Seed Resize in Stable Diffusion
One of the standout features of Stable Diffusion is "Seed Resize." Let's say you generate an image with a seed at a 512x512 resolution. Normally, if you change the resolution, you'd expect the visual elements of your image to change significantly. Not with Seed Resize. By using this feature, the model attempts to maintain the image's visual elements and attributes, even when you shift to a different resolution.

To access this feature, you'll need to check the "Extra" box near the seed field. After ticking this, you can specify the resolution of the original image. This way, even if you change the resolution, the model will aim to produce an image that strongly resembles the original, offering a level of consistency that's often missing from other platforms.
Variations: Control Your Artistic Flair
Suppose you're happy with the image you've generated but wish to experiment with slight alterations. That's where the "Variations" feature comes into play. It offers two primary controls: the Variation strength slider and the Variation seed field. Using these controls, you can direct how much your new image should diverge from the original one.

If you set the Variation strength to maximum, the model will generate an image based almost entirely on the Variation seed. On the other hand, keeping the strength at a minimum will cause the model to closely emulate the original seed. This level of control allows you to fine-tune your creations without starting from scratch.
To access Variations, click the "Extra" checkbox near the seed. Once clicked, the options for Variation strength and seed become available, giving you a simple yet powerful interface to tweak your image to your liking.
Negative Prompts: Precision through Exclusion
We often think about what we want in an image, but what about what we don't want? Stable Diffusion introduces the concept of "Negative Prompts" for this very reason. By using a negative prompt, you can specify elements that you'd like the model to avoid. If you've been getting too many purple skies or unwanted tentacles in your generated images, a negative prompt can be your corrective tool.
How does it work? When you enter a negative prompt, the model uses it for what's known as "unconditional conditioning" during the sampling process. Instead of using an empty string as the basis for generating your image, the software takes your negative prompt as the base condition. This means you have a way to explicitly instruct the software about what not to include, making your output far more tailored to your specific requirements.
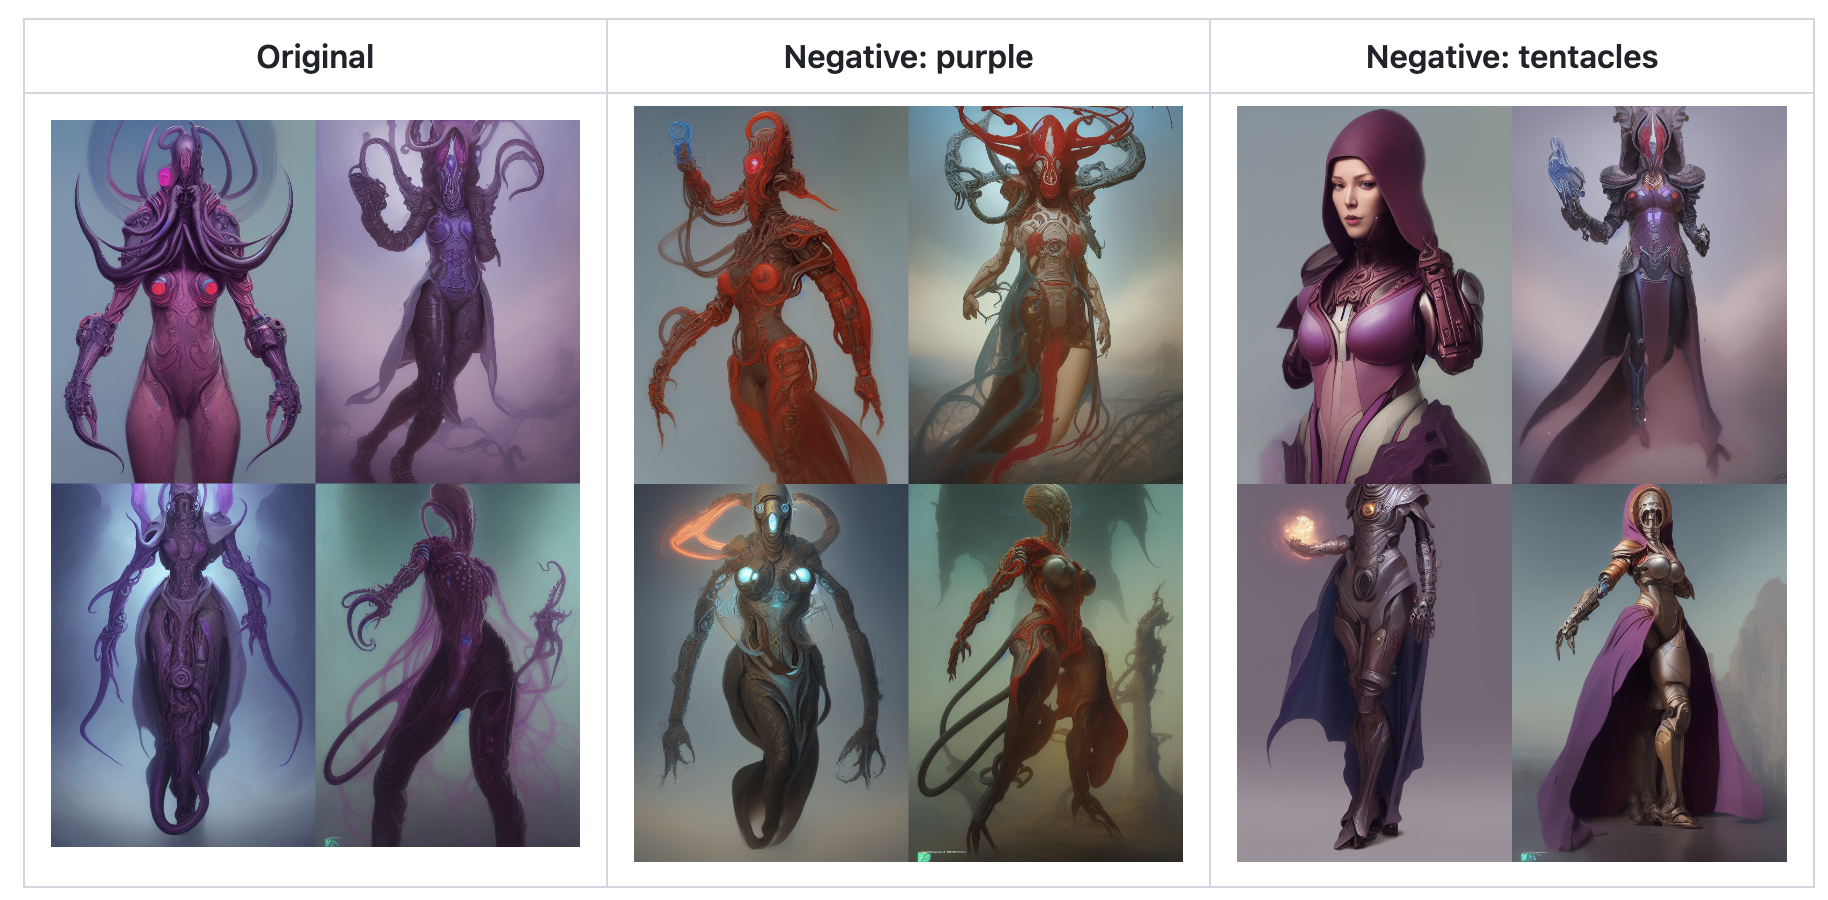
Advanced Negative Prompting
This may sound a bit technical, but it's worth diving into. When you issue a negative prompt like "purple," the model will steer clear of generating purple elements. Similarly, if you enter "tentacles," expect your final output to be devoid of any tentacle-like features. This advanced explanation simply underscores how powerful negative prompting can be for crafting precisely the type of image you desire.
By leveraging these features—be it the versatile resizing options, the highly customizable sampling methods, or the advanced negative prompts—Stable Diffusion allows you a level of control and customization that's rare in digital art platforms. Each feature is like a brush in your artistic toolkit, giving you the freedom to create, modify, and fine-tune your digital artwork down to the finest detail. Whether you're a seasoned digital artist or someone just starting, Stable Diffusion's user-centric design ensures that you have all the tools you need to bring your artistic vision to life.
How to Use Infinite Prompt Length and BREAK Keyword in Stable Diffusion
Lastly, let's explore the 'Infinite Prompt Length' and 'BREAK' keyword, two features that make Stable Diffusion exceptionally flexible.
Infinite Prompt Length: This allows you to break the limitation of how long a prompt can be, giving you the ability to create much more intricate designs.
BREAK Keyword: The BREAK keyword can be used to terminate a prompt sequence prematurely, which is handy for creating dynamic experiences.
// Example
Prompt.set('[yourVeryLongPrompt] BREAK [yourSecondPrompt]');
Conclusion
Stable Diffusion WebUI Styles is a comprehensive tool that fuses the power of machine learning with user-friendly design. We've delved into its capabilities, from basic setup and customizations to advanced features like Hypernetworks, Alt-Diffusion, and ESRGAN. As we've seen, the platform offers an unprecedented level of control and flexibility, empowering users to create dynamic and visually captivating projects. Whether you are a newbie getting your feet wet or a seasoned pro looking for ways to optimize your workflow, Stable Diffusion WebUI Styles has something for everyone. Master its features and you'll open the door to a world of unlimited creative possibilities.
Frequently Asked Questions (FAQs)
What is Stable Diffusion WebUI?
Stable Diffusion WebUI is a web-based user interface designed to facilitate the use of the Stable Diffusion machine learning framework. It streamlines the entire process of setting up, customizing, and executing your projects by offering a comprehensive range of user-friendly options.
What is a Stable Diffusion Style?
A Stable Diffusion style refers to a set of parameters and configurations that govern how the Stable Diffusion engine processes an input. This style can include details like the type of network to use, the number of steps for diffusion, and the specific prompts or editing commands that shape the output.
Where do I put styles in CSV Stable Diffusion?
In Stable Diffusion, you can add styles within a CSV (Comma-Separated Values) file. This CSV file can be uploaded to the WebUI, and it typically includes columns specifying different attributes like style name, diffusion steps, and any special flags or configurations. Once uploaded, these styles become selectable options within the WebUI.
How do I access Stable Diffusion in WebUI?
To access Stable Diffusion in WebUI, you typically navigate to the web address where your Stable Diffusion WebUI is hosted. This could be a local address if you're running it on your own machine or a public URL if it's hosted externally. Once there, you'll find a user interface that allows you to manage all aspects of your Stable Diffusion projects.