How to Use Midjourney Blend Command: A Step-by-Step Guide
Published on

Welcome to the ultimate guide on Midjourney Blend, a feature that's revolutionizing the way we think about image blending. Whether you're a graphic designer, an artist, or someone who loves to experiment with visuals, this guide is your one-stop-shop for mastering this incredible tool.
In today's digital age, the ability to manipulate and blend images is not just a skill but a form of art. Midjourney Blend takes this art to a whole new level, offering a plethora of features that are both intuitive and powerful. So, let's dive in and explore what makes Midjourney Blend a game-changer in the world of digital artistry.
What is Midjourney Blend?
Midjourney Blend is a command within the Midjourney AI tool that allows users to blend multiple images seamlessly. Unlike traditional image blending tools that require extensive manual adjustments, Midjourney Blend uses artificial intelligence to analyze the elements of each image and create a harmonious blend. The feature is accessible through a simple /blend command, making it incredibly user-friendly.
How Does Midjourney Blend Work?
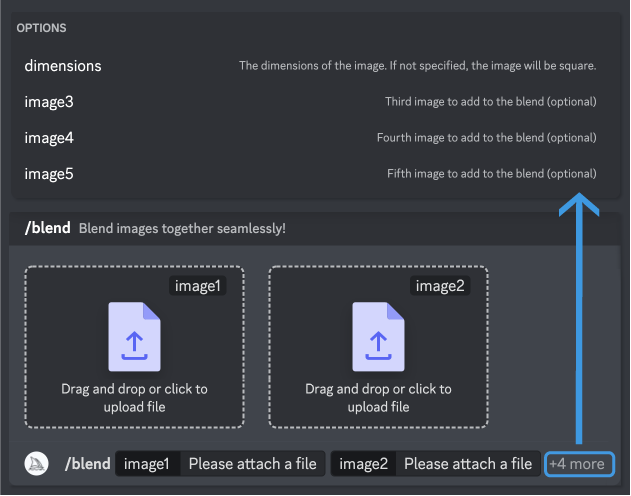
The mechanics of Midjourney Blend are both straightforward and ingenious. After initiating the /blend command, a pop-up window appears, prompting you to upload your chosen images. Here's a step-by-step guide to using the feature:
- Initiate the Command: Type
/blendin the Midjourney interface. - Upload Images: A pop-up window will appear. You can upload up to 5 images.
- Select Aspect Ratio: Choose between square, portrait, and landscape orientations.
- Blend: Hit the 'Blend' button and let Midjourney do its magic.
Sample Prompt:
/blend [Image1] [Image2] --aspect-ratio=squareTips for Effective Midjourney Blending
To get the most out of Midjourney Blend, there are several tips and tricks you should keep in mind:
- Aspect Ratio: Always use images with the same aspect ratio for a more harmonious blend.
- Blend Ratio: Use custom suffixes to control the blend ratio. For example, you can use
--ratio=70:30to blend 70% of the first image with 30% of the second image. - Blend Weight: This parameter allows you to control the prominence of each image in the final blend. Use the
--weightsuffix followed by numerical values to set the weight for each image.
Sample Prompt with Detailed Parameters:
/blend [Image1] [Image2] --aspect-ratio=square --ratio=70:30 --weight=1.5Midjourney Blend v5: What's New?
The latest version, Midjourney Blend v5, has introduced several new features that make the tool even more versatile. These include:
- Advanced Blending Options: The new version allows for more complex blending with additional parameters.
- Faster Processing: Midjourney Blend v5 boasts quicker image processing times, allowing you to see your blended masterpiece in seconds.
- Enhanced User Interface: The updated UI is more intuitive, making it easier for both beginners and experts to navigate through the blending options.
By understanding these features and how to use them effectively, you can elevate your Midjourney Blend experience to new heights. So, what are you waiting for? Dive in and start blending like a pro!
How to Write Midjourney Blend Prompts
One of the most intriguing aspects of Midjourney Blend is the ability to use prompts for more customized blending. While the /blend command is incredibly powerful on its own, the use of prompts allows you to take your blending to the next level.
How to Use Midjourney Blend Prompts
Using prompts in Midjourney Blend is a bit different than using them in other commands like /imagine. The /blend command doesn't initially allow for text prompts. However, you can add text later using the Remix function. Here's how to do it:
- Initial Blend: Start by using the
/blendcommand to blend your chosen images. - Remix Function: After the initial blend, you'll see options like
v1,v2,v3, etc. Click on these to enter the Remix function. - Add Text: In the Remix function, you can add the text that you would have initially included if you were using image prompts.
Sample Prompt for Remix Function:
/blend [Image1] [Image2] --remix="sunset sky"Advanced Prompt Techniques
For those looking to get even more technical, Midjourney Blend offers advanced prompt techniques like the /prefer suffix command. This allows you to add a whole prompt that will be automatically included in any subsequent image generations.
Sample Prompt with /prefer Suffix:
/blend [Image1] [Image2] --prefer="sunset over ocean"Midjourney Blend Parameters: A Deep Dive
Parameters in Midjourney Blend are the building blocks that allow you to fine-tune your blended images. Understanding these parameters can significantly enhance the quality of your blends.

Key Parameters to Know
- Aspect Ratio: Controls the dimensions of the blended image. Options include
square,portrait, andlandscape. - Blend Ratio: Dictates the percentage of each image in the final blend. Specified using a
--ratiosuffix. - Blend Weight: Determines the prominence of each image in the blend. Specified using a
--weightsuffix.
Working with Multiple Parameters
You can combine multiple parameters to create highly customized blends. The order of the parameters doesn't matter, but it's crucial to ensure that each parameter is correctly formatted.
Sample Prompt with Multiple Parameters:
/blend [Image1] [Image2] --aspect-ratio=portrait --ratio=60:40 --weight=2By mastering these parameters, you can create blends that are not only visually stunning but also precisely tailored to your artistic vision.
Midjourney Blend Tips and Tricks
Even if you're familiar with all the features and parameters, there are always some extra tips and tricks that can help you get the most out of Midjourney Blend.
Optimize Image Quality
To ensure the best possible blend, always use high-resolution images. The higher the image quality, the more detailed and vibrant your final blend will be.
Experiment with Blend Weight
Don't hesitate to experiment with the blend weight. Sometimes, even a slight adjustment can make a significant difference in the final image.
Use the Latest Version
Always make sure you're using the latest version of Midjourney Blend. Each new version comes with improvements and additional features that can enhance your blending experience.
By incorporating these tips into your Midjourney Blend workflow, you'll be well on your way to creating blends that are not only visually captivating but also technically impeccable.
Exploring Midjourney Blend Options: The Hidden Gems
While Midjourney Blend offers a plethora of features right on the surface, there are also several hidden options that can significantly enhance your blending experience. These options are often overlooked but can be game-changers when it comes to creating the perfect blend.
The Power of Preview
One of the lesser-known features is the Preview option. This allows you to see a quick preview of the blend before you finalize it. It's an excellent way to make last-minute adjustments without having to go back and redo the entire process.
Sample Prompt for Preview:
/blend [Image1] [Image2] --previewCustom Suffixes
Midjourney Blend allows you to add custom suffixes to your commands. These can be particularly useful when you're looking to achieve a very specific effect. For example, you can use a custom suffix to add a vignette effect to your blend.
Sample Prompt with Custom Suffix:
/blend [Image1] [Image2] --custom-suffix="vignette"The Reblend Option
Another hidden gem is the Reblend option. This allows you to quickly reblend the last set of images you used without having to upload them again. It's a massive time-saver, especially when you're experimenting with different parameters and effects.
Sample Prompt for Reblend:
/blend --reblendMidjourney Blend in Professional Settings
Given its advanced features and versatility, Midjourney Blend is not just for hobbyists but also has applications in professional settings such as graphic design, advertising, and even data visualization.
Graphic Design
In graphic design, the ability to blend images seamlessly is often crucial. Whether you're creating a composite image for a client or blending textures for a digital artwork, Midjourney Blend offers a level of precision and control that is hard to achieve with other tools.
Advertising
In the world of advertising, visual impact is everything. Midjourney Blend allows you to create striking images that can capture attention and convey messages more effectively. Its advanced parameters enable you to fine-tune the images to align perfectly with brand guidelines.
Data Visualization
While not its primary use, Midjourney Blend can also be used in data visualization to create more engaging and informative visual representations. By blending different types of graphs or data points, you can provide a more comprehensive view of the information you're trying to convey.
Conclusion: Why Midjourney Blend is a Must-Try
Midjourney Blend is more than just a tool; it's a playground for creativity. Its wide range of features, from basic blending options to advanced parameters and hidden gems, makes it a versatile platform suitable for various applications. Whether you're a casual user looking to create unique images for social media or a professional seeking to elevate your work, Midjourney Blend offers something for everyone.
By understanding its features, mastering its parameters, and experimenting with its various options, you can unlock the full potential of this incredible tool. So go ahead, dive into the world of Midjourney Blend, and let your creativity soar!
Frequently Asked Questions (FAQs) About Midjourney Blend
What is the blend option in Midjourney?
The blend option in Midjourney, commonly accessed through the /blend command, is a feature that allows users to combine multiple images into a single, harmonious output. Unlike traditional image editing tools that require manual adjustments, Midjourney Blend uses artificial intelligence to analyze the elements of each image and create a seamless blend. This feature is particularly useful for artists, graphic designers, and anyone interested in creating unique visual compositions.
Sample Prompt:
/blend [Image1] [Image2]What is the blend ratio in Midjourney?
The blend ratio in Midjourney refers to the percentage of each image that will be included in the final blended output. This is controlled using the --ratio suffix when using the /blend command. For example, if you specify a blend ratio of 70:30, 70% of the first image and 30% of the second image will be used in the final blend. This allows for greater control over the appearance of the blended image.
Sample Prompt with Blend Ratio:
/blend [Image1] [Image2] --ratio=70:30How do you mix faces in Midjourney?
Mixing faces in Midjourney is a fascinating application of the /blend command. To mix faces, you would upload two or more face images and use the /blend command to combine them. The AI algorithms analyze the facial features and create a new face that is a blend of the uploaded images. This can be used for various purposes, from creating fictional characters to merging features of real people.
Sample Prompt for Mixing Faces:
/blend [Face1] [Face2]Does Midjourney do style transfer?
Yes, Midjourney is capable of performing style transfer, although this is not directly related to the /blend command. Style transfer involves taking the artistic style of one image and applying it to another. This is often used to make one image look as if it were painted by a famous artist or to apply a particular visual aesthetic to a photo. While the /blend command focuses on merging content from multiple images, style transfer in Midjourney is usually achieved through other commands or features within the platform.
Sample Prompt for Style Transfer:
/style-transfer [ContentImage] [StyleImage]